
AI for Customer Service and Operations - The Do's and Don'ts
ServiceNow’s AI-driven technology redefines what's possible, from streamlining customer interactions to boosting agent productivity. Discover insider...

When working with update sets in ServiceNow, following the good practices is essential to avoid errors and ensure smooth migrations. Understanding the dos and don’ts can help prevent common pitfalls, maintain data integrity, and streamline deployment. This article outlines key guidelines for handling update sets effectively, covering best practices and critical mistakes to avoid to ensure successful updates and stable ServiceNow environments.
Update sets in ServiceNow should have unique names to prevent confusion and ensure clear identification of each set's purpose and contents. Having distinct names helps track changes more effectively, particularly in environments where multiple update sets are being worked on simultaneously by different teams or developers. Unique names also minimize the risk of accidentally applying or retrieving the wrong update set can lead to deployment errors or loss of important customizations. Here’s an example naming convention that you can apply to your project:
<CompanyName> - <StoryNumber> - <StoryShortDescription> - <VersionCounter>
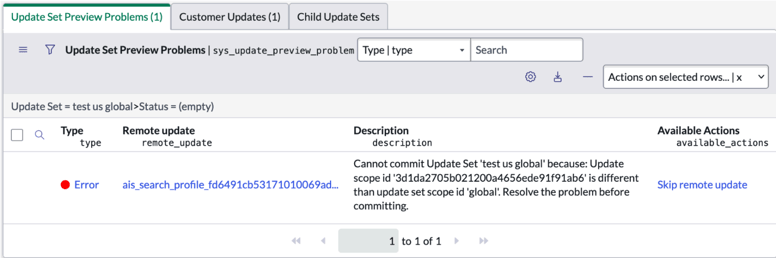
This will help you to avoid mistakes when committing the wrong update set, for example from different applications. In the screenshot below you can see two example update sets from different scopes being retrieved to the instance. Which one should we commit if we only want to implement global updates?

Same names could also be confusing if we want to move an update from one update set to another. In the screenshot below, I want to move the update in Global to the „test us”, but which one should I choose?

Creating batches is both simple and very useful, especially if you need to deploy many update sets. Preparing batches for each deployment not only saves time during the deployment, but also ensures that all the necessary update sets are committed.
To group update sets in a batch just simply set the Parent field of the update set to be the child, to the name of the update set to be the parent. And that’s it, both update sets are grouped together and will be retrieved, previewed and committed with one click on the next instance.
Here’s an example process of how to handle update set batches across instances:
Create an update set on the Dev instance, work on it and make it complete when you are finished.
On the next instance (let’s call it Test) create a new update set that will be the top update set of our batch (you can name it „<CompanyName> - <DeploymentDate> Deployment Batch”, for example) and make sure to leave the state as „In progress”.
Retrieve update sets to the Test instance from Dev. Preview and commit your update sets. Immediately after committing, go to Local update sets, find the committed update set and set its parent to our previously created update set („<CompanyName> - <DeploymentDate> Deployment Batch”).
Add other update sets to this batch in the same way.
When you have finished creating the batch and there is time to promote it further, set your parent update set („<CompanyName> - <DeploymentDate> Deployment Batch”) to „Complete”.
Go to the next instance (let’s call it Prod) and retrieve the update sets there. Go to the „Remote Batch Update Sets” tab where you should find your batch ready to be previewed and committed.
As you can see, even if you have dozens or even hundreds of update sets in your batch, it only takes one click to preview them all and only one click to commit them all. What is also very useful is that when you preview a batch, ServiceNow considers all the update sets it contains. So if there’s an update in update set A that’s needed in update set B and they’re both in the same batch, you won’t get an error when previewing.
Note that this is the same problem as described in "Updating a previously closed update set", but it may be even harder to detect a problem when it occurs. A more detailed explanation of the causes of this problem can be found in the mentioned section. It is important to note that when you create or modify a batch you are also making changes to update sets. So if you want to add a closed update set to a batch or add/remove an update set from a closed batch, you may encounter similar issues to those described in the section below and for the same reasons. An additional problem with ignoring these best practices is that your update sets may be grouped into unexpected groups.
Consider an example situation:
You create update set A and update set B, make A the parent of B and keep A in progress.
Then you create update set C and satisfied with your solution, you set it to Complete.
As your solution in C is not as good as you think, you create update set D, make C a parent of D and in update set C make B a parent. So your batch should now look like A->B->C->D.
You close A and retrieve the whole batch to the next instance.
After committing this batch you find that the changes from C and D have not be committed.
What happened is that you didn’t know that someone had retrieved update sets before you added C to the batch, but after you had completed it. So the version of update set C doesn’t have the Parent field filled in on the next instance, so it’s not part of the batch there. So, as always, you should NEVER make any changes to a previously closed update set. This includes adding or removing it from the batch.
Moving updates between update sets in ServiceNow is useful for organizing and managing changes more efficiently. Sometimes, updates may end up in the wrong update set or need to be reorganized to align with specific deployment plans. It is also very easy as all you need is to change value of the update_set field on the customer update record you want to move.
You must be very careful about applying the updates you have in the update set. Never move records from one scope to update set from another. Before you close an update set, always check that all the updates are within the same scope as the update set. If not, you cannot commit such an update set without encountering errors similar to the one shown in the screenshot below.
The safest and most reliable way to handle update sets is to NEVER re-open them. Once you have set an update set to Complete, you should not change anything in it, including changing its name, adding or removing updates, or adding or removing it from the batch, unless this update set has previously been added to an in-progress batch. This is particularly important if several people are working on this instance.
To illustrate the risk of re-opening update sets here’s a short story. I have created an update set to which I added the „Fancy button” UI Action. Then I set the update set to Complete as I was very proud of my solution. Unfortunately, the next day, the customer told me that he needed to add some automation. As I didn’t want to create another update set I set my previous one to In progress and created a Business Rule named „Boring script”. Then I made this update set Complete again. Refer to the screenshot below.

After that, the customer was very happy, so I retrieved the update sets on the Test instance and opened my freshly retrieved update set. The result is shown in the screenshot below.

As you can see, something is wrong in here. Why is there only a „Fancy button” and no „Boring script”? What happened is that I didn’t know that in the meantime, after I had completed my first update set, the service desk had to prepare an urgent fix for this instance. And in the process, they retrieved their update set as well as mine because it was completed at the time. And the ServiceNow does not retrieve previously retrieved update sets, so when I wanted to retrieve my update set the next day, the old one was still on the Test instance. So to sum this up, after you set an update set to Complete, you can’t be sure that someone hasn’t fetched it. Then you can’t be sure that the next time you click retrieve, you will get the current version, not the old one that was previously retrieved. It is easy to spot when you have one update set to commit, but when there are more ,it is easy to make a mistake. Bonus tips
Using Health Scan to scan update sets in ServiceNow is an essential practice to ensure the quality and stability of customizations before deploying them to higher environments. Health Scan
automatically reviews update sets for common issues, such as performance concerns, security vulnerabilities, and adherence to best practices. And, most importantly in my opinion, this can be a fully automated process that runs every time you complete an update set. It is very easy to use, click on the UI action that appears when the update set is complete.

Backing out update sets in ServiceNow is generally discouraged because the process does not fully revert all changes made by the update set. If issues occur, applying a new update set to correct or undo specific changes is usually a safer and more effective approach. From my experience backing out update sets often creates more problems and eventually take more time to fix than undoing changes in a new update set.
Handling update sets in ServiceNow requires following best practices to ensure smooth migrations and maintain system integrity. Adhering to these guidelines can prevent common errors, streamline deployment, and keep your ServiceNow environment stable and efficient.

ServiceNow’s AI-driven technology redefines what's possible, from streamlining customer interactions to boosting agent productivity. Discover insider...

On January 17th, 2025, the EU regulation called the Digital Operational Resilience Act (DORA) will come into force to strengthen the IT security of...
Streamlining Workplace Experience with ServiceNow Have you heard about the Workplace Service Delivery (WSD) module in ServiceNow? WSD is a...