In this post we’ll go through some ways to store information on system properties and things to consider while doing so. There’s also gonna be a few different use cases to give you more ideas on how to utilize system properties in your work. We’ll briefly cover the basics but I’ll be assuming that you already have some technical knowledge and scripting experience in ServiceNow.
When writing scripts and implementing other custom functionalities we should aim for dynamic and scalable solutions. However, sometimes this won’t be as straightforward as some information might not be stored in the system or they cannot be reliably queried from anywhere so we’d have to hardcode it. In these cases ServiceNow recommends using system properties to store the value and using gs.getProperty() -method to get the property value. This way the value can be changed without editing the script and in cases where multiple functionalities use the same property you’ll only need to change it in one place.
Starting with the basics
To make sure that everyone is on the same page let’s briefly go through the basics and some examples.
System properties can be found from the Application Navigator under System Properties -> All Properties or by writing sys_properties.list on the navigator and pressing enter.

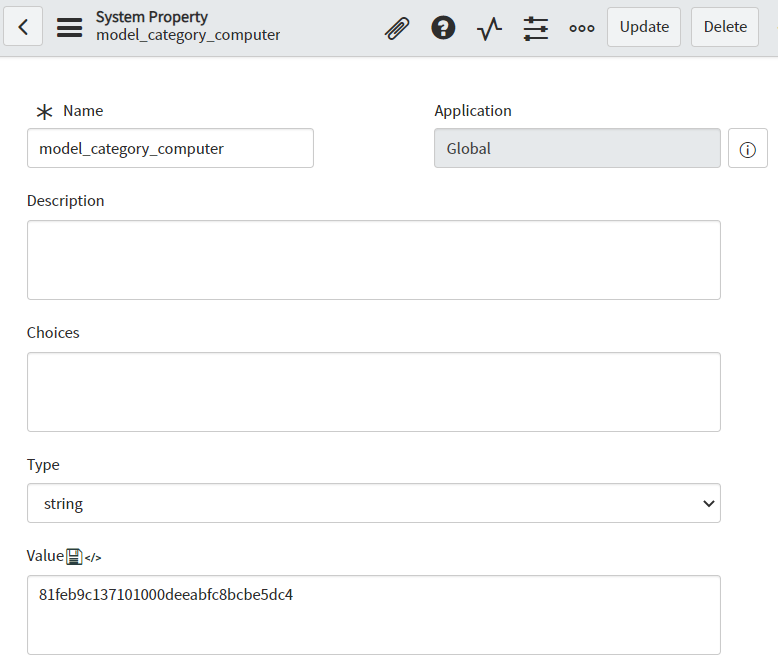
Here is a system property form and for our topic today we’ll focus on the name and the value fields.
After we have created a system property we can use a baseline gs.getProperty() method to get the property value by giving it the name of the property as a parameter.
![]()
Variable ‘sysPropertyValue’ now has value of ‘81feb9c137101000deeabfc8bcbe5dc4’ as a string and can now be used on the script.
The Value field on system property has a limit of 4000 characters but that aside you can add pretty much any string in there. One way to add “more” information on the property is to add it as a list.

This can be used as is but If we want to handle this as an array instead of a single string value with everything clumped together we would have to split it.
![]()
Now we have an array that we can loop through and access the values individually.
Advanced use
Now that we’ve covered the basics we can move on to a bit more advanced use. Like said the system property value can be almost anything so it can also be an object in string format. This way we can store even more information on the property that would otherwise have to be added to the script.

Since the value is returned as a string we again have to convert it before using it. For objects we have to use JSON.parse() to turn the string into an actual object so we can access the key-value pairs.
![]()
After this we can access individual keys in the object.
![]()
So as a whole the script would look like this.

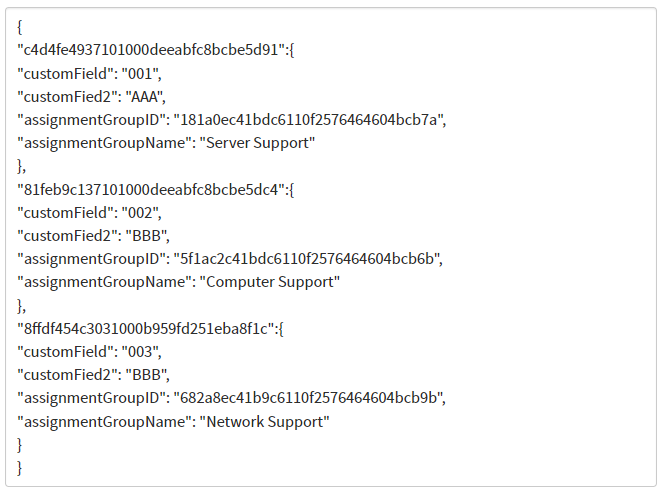
In case you wish to add even more information in the same system property you can also do something like this.

In this example we have an object containing nested objects that have a model category sys id as a key. Let’s say we have a transform map going through CMDB data in an import table and we have a task to set certain values on the CMDB based on the model category. When we get the model category value we can access specific objects in the system property.
Otherwise we’ll need the same script as with a single object but for this we also need to access the specified object before accessing its values.
![]()
So the whole script would look something like the following.

Using the system properties like this keeps the scripts shorter and adding new fields, or in this example new model categories, only requires adding them to the system property. Also, we don’t have to use all of the values in the object meaning that we can store values that can be used in other scripts. This way we have one centralized place to maintain the values for multiple functionalities.
Things to consider
When you are creating new system properties try to follow the naming conventions of the current instance you're working on. This keeps the table tidy and helps others to identify the properties. Also, consider using the description field to inform others about what the property does, and writing instructions on how to add more information or what to consider if you're modifying the value.
If you store instance specific values then you want to create a data preserver for the property. For example if you have a different integration endpoint for every instance saved in a property you don’t want to have overwritten during a system clone then you should preserve it. Data preservers can be found on application navigator System Clone -> Clone Definition -> Preserve Data. Create a new record and give it a describing name, choose System Property [sys_properties] as a table and set the condition so it matches your property or properties. Please note that the persevere has to be created in the production instance for it to work.
Closing
Now we have gone through the basics of creating system properties and getting the values for our scripts. Please note that the examples provided earlier were not the only use cases but rather some samples to feed your imagination to think of how to utilize them in your work. So don’t get too stuck up on model categories and sys ids but rather think on how this could help you or your customer.
